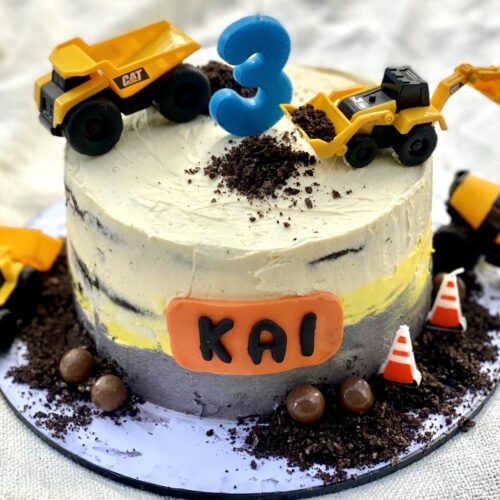
Construction Cake (less sweet buttercream)
This Construction Cake will put the biggest smile on your little one's face! Easy moist chocolate cake with less sweet vanilla buttercream
Ingredients
For the chocolate cake
- 2⅔ cup plain flour (all purpose flour 400g/14oz) (NOTE 1)
- 1 cup unsweetened cocoa powder (90g/3oz)
- 2½ cup caster sugar (530g/19oz) (NOTE 2)
- 2¼ tsp bi-carb soda (baking soda)
- 2¼ tsp baking powder
- 1 tsp salt
- 3 large eggs
- 1½ cup milk
- ¾ cup vegetable oil (or canola oil)
- 3 tsp vanilla extract
- 1½ cup boiling water (375ml/13floz)
For the roux and Ermine frosting
- 7½ tbsp plain flour (85g/3oz)
- 1½ cup sugar (340g/12oz)
- 1½ cup warm milk (375ml/13floz)
- 2½ tsp vanilla extract
- ⅛ tsp salt
- 350 gm unsalted butter (softened)
- 1-2 drops yellow food colouring (NOTE 3)
- 1-2 drops black/grey food colouring (NOTE 3)
Optional decorations (take care as some parts may cause choking)
- 2 ready to roll fondant/icing (in any 2 colours) (NOTE 4)
- 8 oreo (or plain chocolate biscuit/cookie)
- 10 Maltesers or chocolate balls
- mini construction truck toys (NOTE 5)
- candles
Instructions
For the chocolate cake
- Preheat oven to 180°C (360°F) or 160°C (320°F) for fan-forced ovens. Grease and line the sides and bases of 3 x 20cm (8in) round cake tins with non-stick baking/parchment paper.Sift the flour, cocoa powder, sugar, baking soda, baking powder and salt into a large bowl, then give it a whisk to combine. Make a well in the centre of the dry ingredients, then add in the oil, milk, eggs and vanilla extract. Whisk to combine until smooth, then add in the boiled water, and continue to whisk for 10 -15 seconds. The batter should be very runny!
- Pour the batter evenly into the prepared tins. Bake for 30 to 35 minutes or until a skewer comes out clean when inserted into the centre of each cake.Leave the cakes to cool in their tins for 15 minutes, then turn them out onto a cooling rack. Allow the cakes to cool completely before frosting them.
For the roux and Ermine frosting
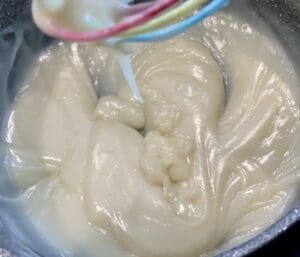
- Whilst waiting for the cake to bake, make the roux. Place sugar and flour into a large saucepan and place it over medium heat, then stir for 30 seconds. Slowly drizzle in the milk whilst whisking constantly so the mixture won't catch to the bottom of the pan. The roux will slowly thicken, continue to cook and stir until it's thick like custard. Transfer the roux into a bowl, then cover it with plastic film. Press the film down so it clings onto the surface of the roux so a skin doesn't form. Allow the roux to cool completely at room temperature.
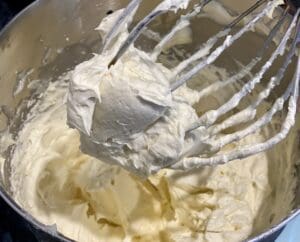
- Using a hand or stand mixer, beat the butter at low speed for 10 seconds with the whisk attachment. Increase the speed to high and beat the butter for 5 minutes or until it looks very pale. Scape the sides and bottom of the bowl with a spatula and whisk again for 20 seconds. Add in the vanilla and salt and beat for another 20 seconds. With the mixer still running and at high speed, place in the cooled roux mixture a spoonful at a time. Beat until the buttercream is thick, fluffy and can hold its shape.
Filling and crumb coat
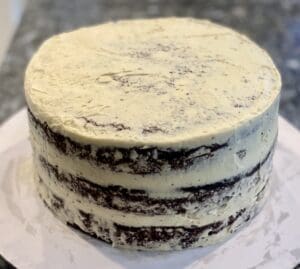
- Use a cake leveller to slice each cake evenly or carefully use a long bread knife to slice the tops off to make them flat. Place a cake on a cake board on top of the cake turntable. For the filling, use a small cake scoop (approx. 1.5 tbsp) and place 4 scoops of frosting over the cake, then use a spatula to spread the icing. Repeat with the second cake layer and filling.
- For the crumb coating top of the cake with 4 scoops of frosting, use a long flat spatula to spread the buttercream thinly on the top and sides of the cake. Chill the cake in the fridge for a minimum of 1 hour or 20 minutes in the freezer.
Decorating and finishing
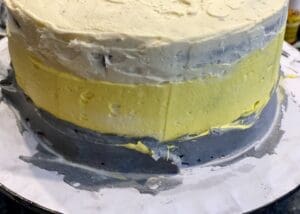
- Place another layer of frosting over the top of the cake and only halfway down the side of the cake, and level it out using a long spatula. Divide the remaining frosting evenly into two bowls. Place 1 or 2 drops of yellow food colouring in one and black in the other. Mix well until the colour looks even. Use a spatula to spread the yellow frosting on the side of the cake in the middle, then spread the bottom section of the cake with the grey frosting. Spin the turntable and even out the frosting with a spatula.
- Use a rolling pin to roll the coloured fondant/icing until it's thin but won't tear when you lift it. Cut the orange fondant into a banner shape of your choice. Use a letter cutter to write your little one's name with the black fondant, then lightly press the letters onto the banner. If the letters don't stick, brush a little water on the back of the letters. Carefully stick the banner on the side of the cake.

- Place the Oreos into a food processor and blitz them into crumbs. This will be the dirt, place it anywhere you like around and on top of the cake. Place the construction toys on top and on the bottom of the cake. Place some Maltesers in the dirt.
Notes
(NOTE 1) Plain flour (all-purpose flour) does not have any leavening or raising agents (such as baking powder) mixed into the flour.
(NOTE 2) Caster sugar (superfine sugar) - Caster sugar has finer granules than regular white sugar, but it's not the same as icing/powdered sugar. Many baking or candy recipes call for caster sugar as it dissolves faster and better into mixtures. If you can't find caster sugar, you can make your own by placing regular sugar in a food processor or blender. Pulse the sugar a few times until it looks finer, but don't over-blitz to a powder consistency. However, you could just use equal amounts of regular white sugar.
(NOTE 3) Food colouring - I used gel food colouring as only a few drops will give us a deep or vibrant colour. Mine was black and yellow, but you could use whatever colours you like for the outer layer of the buttercream.
(NOTE 4) Fondant or icing - To make life easier, I bought ready-to-roll fondant/icing from the supermarket. It came in a hard rectangle block wrapped in plastic. All I needed to do was roll it out and cut it into shapes. Mine was orange and black, but you could use any two colours.
(NOTE 5) Construction truck toys - I found a packet of these cute construction trucks in the toys area at my local BIG W (discounted department store). The traffic cones (witches' hats) are candles, which I found there as well.
Leftovers - Transfer the cake into a covered cake container and store it in the fridge for up to 3 to 4 days.
I've used a third-party application to calculate the calories and nutritional information, so please use this as an approximate guide only.
Cooking measurements are in Australian standard spoon and cup measurements. For specific details and conversions, visit our Australian Cooking Measurements page.
Nutrition
Serving: 1servingCalories: 545kcalCarbohydrates: 78gProtein: 7gFat: 33gSaturated Fat: 15gPolyunsaturated Fat: 7gMonounsaturated Fat: 8gTrans Fat: 1gCholesterol: 87mgSodium: 436mgPotassium: 211mgFiber: 3gSugar: 55gVitamin A: 672IUCalcium: 112mgIron: 3mg