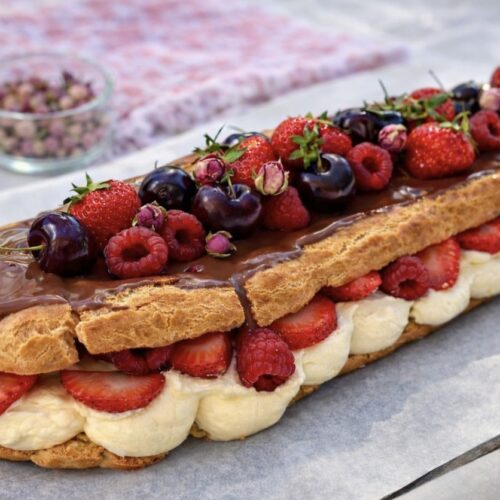
Chocolate Eclair (Jumbo-sized with berries)
Create a show-stopping giant chocolate eclair with fresh berries, lashings of cream, and rich chocolate ganache
Ingredients
Choux pastry
- 115 gm unsalted butter
- 1 cup water
- 2 tsp sugar
- ½ tsp salt
- 1 cup plain/all-purpose flour (NOTE 1)
- 4 large eggs
Egg wash
- 1 egg
- 1½ tsp water
Filling
- 2 cup thickened/whipping cream (NOTE 2)
- 3 tbsp icing/powdered sugar (NOTE 3)
- 1 tsp vanilla extract
- 250 gm strawberries (sliced)
- 125 gm raspberries
Chocolate
- 250 gm milk or dark cooking chocolate (chopped into small chunks) (NOTE 4)
- 1 tbsp vegetable oil (or canola oil)
Berries (optional)
- strawberries
- raspberries
- cherries
- dried roses or edible flowers
Instructions
- Choux pastry Preheat the oven to 220°C (430°F) or 200°C (390°F) for fan-forced ovens. Line a large baking tray with non-stick baking or parchment paper.
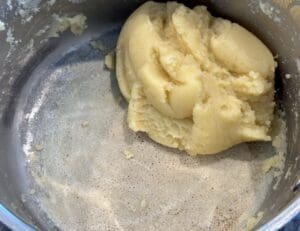
- Place the butter, water, sugar, and salt into a medium saucepan over medium-high heat and bring to a boil. Add the flour all at once and stir vigorously. Continue stirring for 1–2 minutes until the mixture pulls away from the sides of the pan and forms a rough ball.

- Transfer the dough to the bowl of a stand mixer fitted with the paddle attachment. Beat at medium-high speed for 20 seconds to release excess heat. Add the eggs one at a time, beating for about 30 seconds after each addition until fully incorporated.The pastry dough is ready when it slowly falls from the paddle in a thick ribbon when lifted.
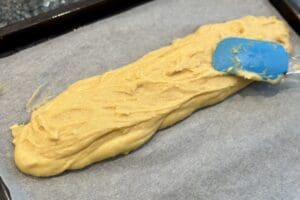
- Place small dabs of dough under each corner of the parchment paper to hold it in place. Transfer the remaining dough to the centre of the tray and shape it into a long loaf approximately 35 × 8 cm (14 × 3 in).

- In a small bowl, whisk together the egg and water to make the egg wash. Using a pastry brush, lightly brush the egg wash over the top and sides of the dough, gently smoothing and shaping it as needed.
- Bake for 10 minutes, then reduce the oven temperature to 200°C (390°F) or 180°C (360°F) for fan-forced ovens. Bake for a further 20 minutes, rotate the tray, and then bake for another 10 minutes, or until the pastry is golden and puffed.
- Transfer the pastry to a cooling rack and allow it to cool for 15 minutes. The pastry will deflate slightly; this is normal because of its large size.
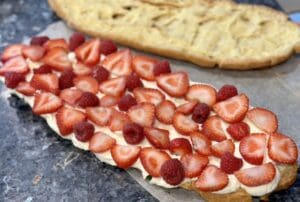
- FillingUsing a bread knife, carefully slice the eclair in half lengthwise. Remove and discard any soft, uncooked pastry from the centre, leaving mostly the crisp pastry shell.
- Place the cream, icing sugar, and vanilla extract into a large bowl. Whip until firm peaks form, or until the cream is thick enough to hold its shape. Pipe or spread the cream evenly over one half of the pastry, then neatly arrange the sliced strawberries and raspberries over the cream.

- ToppingsPlace the chocolate and oil into a microwave-safe jug or bowl. Melt in the microwave in 40-second bursts, stirring well after each burst, until completely smooth. Pour the melted chocolate over the top of the éclair and gently smooth it with a spatula. Chill in the fridge for 30 minutes, or until the chocolate is almost set but still slightly sticky.
- Arrange the berries, cherries, and edible flowers (optional) over the chocolate. Once fully set, the chocolate will help hold the toppings in place. Return the éclair to the fridge and chill for a further 30 minutes, or until the chocolate is completely set. Before serving, allow the éclair to sit at room temperature for 10–15 minutes (less if it’s a very humid day).
Notes
(NOTE 1) Plain flour (All-purpose flour) doesn't have any leavening (raising agents) such as baking powder mixed in.
(NOTE 2) Thickened cream (whipping cream) has gelatine added to it and contains 35% milk fat. I don’t recommend using low-fat cream because it may not whip up well and be a little runny. We need to whip the cream to firm peaks so it'll hold its shape.
(NOTE 3) Icing sugar (powdered sugar, confectionary sugar) - Icing sugar usually comes in two forms over here: icing sugar mixture and pure icing sugar. Icing sugar mixture is softer and lump-free because there's starch or flour added to it. For this recipe, I used icing sugar mixture as the cornstarch helps stabilise the cream.
(NOTE 4) Cooking/baking Chocolate - I used good quality baking milk chocolate as it has a higher percentage of cocoa butter, which makes it easier to melt and work with. However, any regular dark or milk 'eating' chocolate would also work.
Leftovers - Transfer the chocolate eclair into a sealed container and store it in the fridge for 2 to 3 days.
I've used a third-party application to calculate the calories and nutritional information, so please use this as an approximate guide only.
Cooking measurements are in Australian standard spoon and cup measurements. For specific details and conversions, visit our Australian Cooking Measurements page.
Nutrition
Serving: 1servingCalories: 410kcalCarbohydrates: 27gProtein: 6gFat: 33gSaturated Fat: 19gPolyunsaturated Fat: 2gMonounsaturated Fat: 9gTrans Fat: 0.3gCholesterol: 141mgSodium: 142mgPotassium: 188mgFiber: 3gSugar: 16gVitamin A: 939IUVitamin C: 15mgCalcium: 53mgIron: 2mg